
Introduction #
Recently I read a blog post from Henk Boelman in which he uses Azure Logic Apps and Cognitive Services to determine the sentiment of tweets with a specific hashtag. I wanted to play with Logic Apps for a while myself but hadn’t found the time or a nice use case yet. At the time of reading Henk’s blog post, the FIFA World Cup 2018 was well on it’s way and had almost progressed to the 1/8 finals. I already noticed most match hashtags in the group phase were trending so one of the upcoming 1/8 final matches seemed like a nice opportunity to finally start my own experiment with Azure Logic Apps and Cognitive Services.
The idea was to pick a certain 1/8 final match, collect tweets about it using the game’s Twitter hashtag and analyze them with Cognitive Services to gain insight into the course of the match or in some remarkable events that happened during the match.
In this blog post I will show you how to create the Logic App and how to integrate Cognitive Services. We will run the Logic App during a 1/8 final match. Then we will visualize and analyze the results in order to hopefully draw a number of sensible conclusions about the match, solely based on the tweets.
The game plan #
Text Analytics in Azure Cognitive Services can extract key phrases from text so this sound like the right service to use for collecting the most meaningful parts of a tweet. Because World Cup matches are being watched around the globe we can expect tweets in a variety of languages, so we need to translate the tweets to one common language (English seems sensible) before we extract the key phrases. Once we have the key phrases we need to store them for later use, for this we will use Azure Table Storage. To orchestrate this workflow we will use Azure Logic Apps. I’ve never worked with Power BI before so I thought it would be nice to see if I could use it to clean, present and interpret the data.
Create the resources #
I usually start with creating a new Resource group in Azure as a container for the other resources. Once that is provisioned create the following resources in it:
- Azure Logic App
- Translator Text
- Text Analytics
- Azure Storage Account
Create the workflow #
Azure Logic Apps are great for generating automated workflows between different services. Services can be connected through connectors. Results from one step can be used in other steps and conditions can be defined to divert the flow.
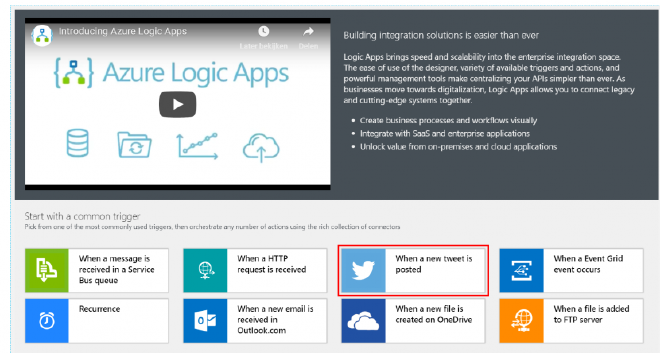
Open the Logic App and click on the Logic App Designer to start configuring the workflow. Select When a new tweet is posted from the list of common triggers to get started.
Login with your twitter account and authorize the Logic App to use your account.
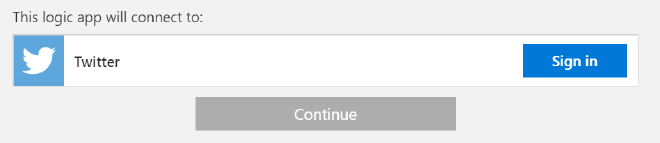
Click on continue and enter a hashtag in the search text.
Unfortunately, the Dutch team was not present at the World Cup, but the Red Devils, the team of our southern neighbors did. They would play their 1/8 final against Japan, which seemed like a nice game to use for this experiment. I entered the official game hashtag (#BELJPN) as search text.
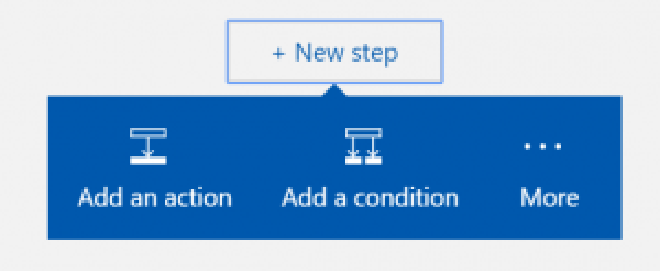
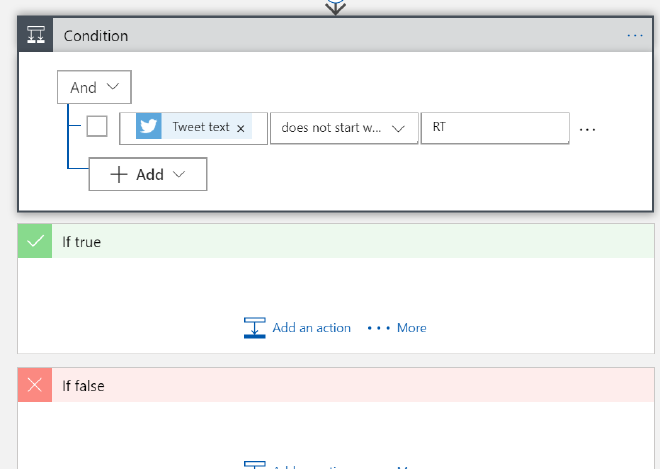
We want to filter out all the retweets to avoid processing the same tweet multiple times. To do so click on New Step and Add a condition.
When you click inside the first ‘Choose a value’ field you will be presented with the dynamic content dialogue. In this dialogue we can search for content and values made available by other steps in the workflow. This is very convenient and we will use it extensively throughout the creation of this workflow.
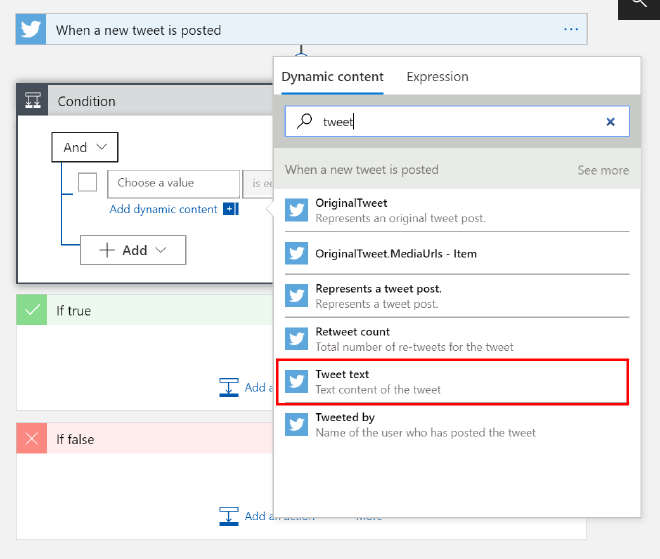
Retweets will start with ‘RT’ so select ‘Tweet text’, ‘does not start with’ and ‘RT’ as values for the condition. Because of this condition the Logic App will split the flow in a If true section which will be hit if the condition is met and an If false section when the condition is not met (obviously).
Detect Language #
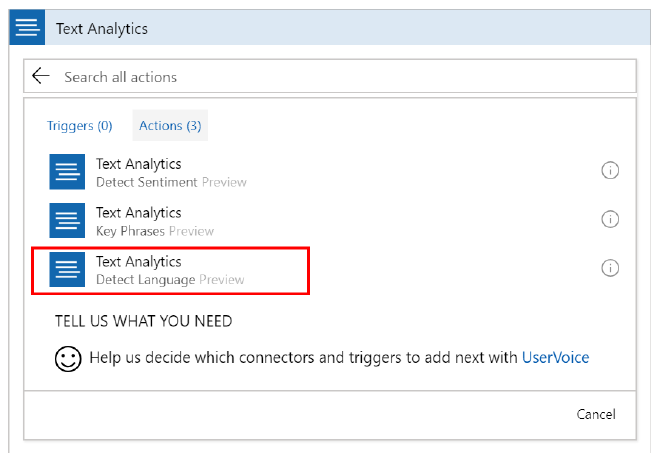
Because we only need to translate non-english tweets we will need to detect the language the tweet was written in. As a bonus we will also gain some insight on the languages used to tweet about this match. Both the Text Analytics and Translator Text services can detect languages, in this post we will use Text Analytics. The Translator Text service can also auto-detect languages so you can choose to skip this step and always call the Translator Text service. I haven’t done the numbers on it, but I think it will be more expensive than detecting the language first and only translate when needed.
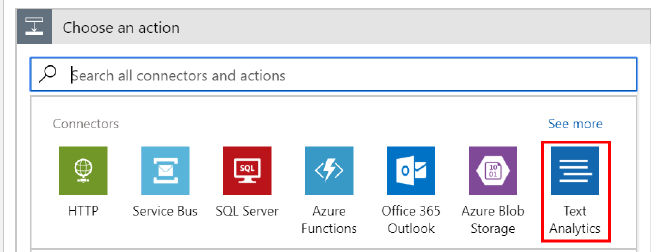
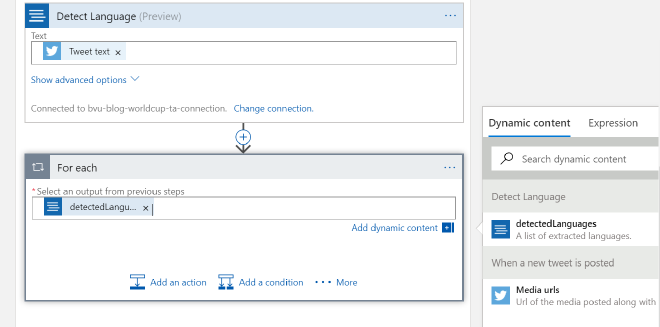
Add an action to the ‘If true’ section and select Text Analytics - Detect Language.
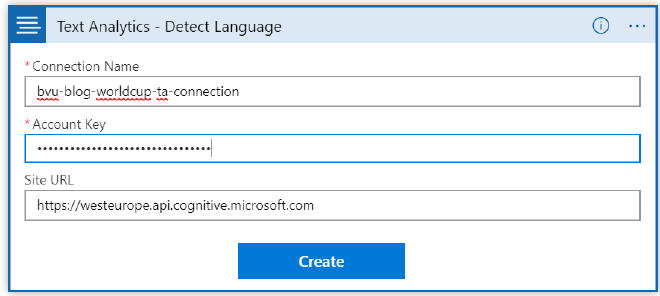
This Cognitive Service will return the detected language and a numeric score between 0 and 1. Scores close to 1 indicate 100% certainty that the identified language is correct. Enter a name for the connection, the key can be found in the Text Analytics resource we created earlier. The URL is the endpoint mentioned in the overview page of the Text Analytics service. Select the tweet text as the text to analyze.
Translate Tweet #
The Text Analytics API will return the detected languages as a JSON array so we need to iterate over the results. Click on the ... More button next to the ‘Add Action’ button and select Add a for each, the Logic App will create a For each step. Select detectedLanguages as the output from previous steps.
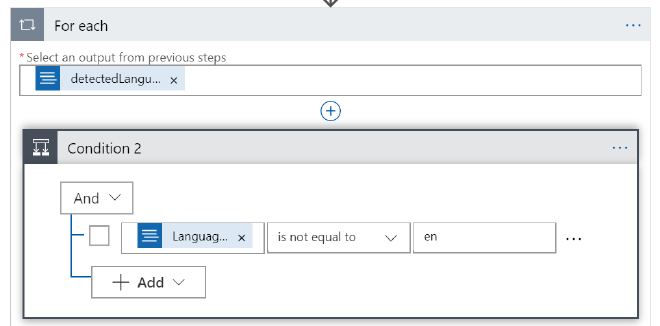
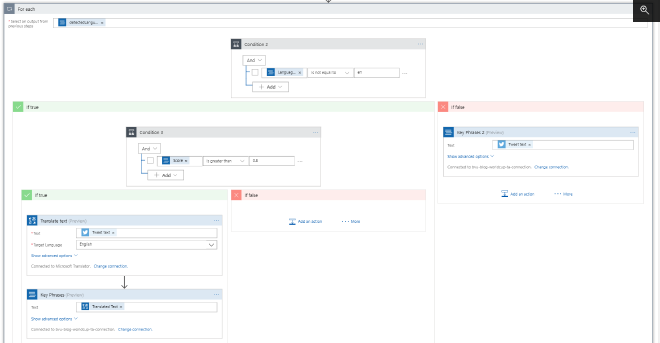
We want to prevent unnecessary calls to the Translate Text API so we will add a new condition to the ‘For each’ step and check if the tweet was not in English (Language Code is not equal to ’en’).
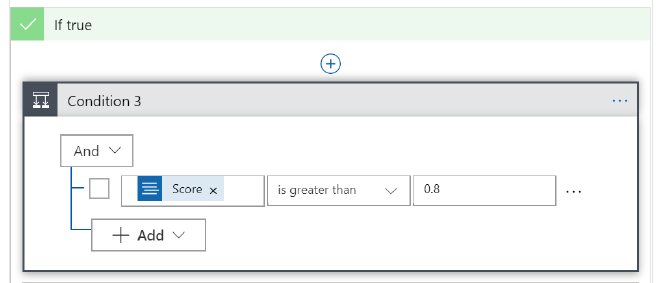
If the tweet is in English we will skip the translation and proceed with the next step which is the detection of key phrases in the tweet. For the non-english languages we only want to proceed and translate the tweet if the Text Analytics service was very confident about the result. We don’t want to waste translations (API calls and money) if it’s not sure it detected the correct language. Add a condition to the ‘If true’ step to require the score from the Text Analytics step to be greater than 0.8. Only when this condition is met we will translate the tweet text to English.
Add a new action to the ‘If true’ step and select the Microsoft Translator - Translate text action. Select the ‘Tweet text’ as text to translate and select ‘English’ as target language.
Extract Key Phrases #
At this stage we have the original tweet or a tweet translated to English. Now we can use Key Phrase Extraction, another capability of the Text Analytics Cognitive Service, to quickly identify the main points of the tweet. We will collect all key phrases from all tweets and analyze which ones occur the most. This will hopefully give us some insights in the main events or key players of the game.
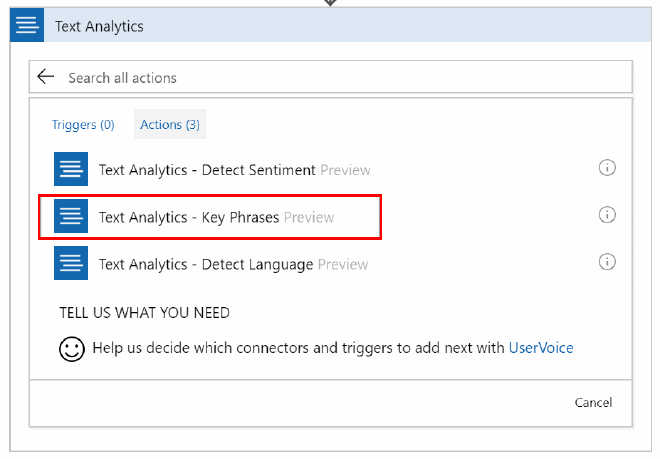
Continue with adding a new action after the ‘Translate text’ action. Once again select the Text Analytics connector but this time select Key Phrases as action and Translated Text as the text to analyze.
Do the same in the ‘If false’ step after we check if tweet was in English, but this time select the Tweet Text as the text to analyze. At this point the ‘For each’ step in the Logic App should look something like this:
Store Key Phrases #
Now that we have identified the main points of a tweet in the form of key phrases we need to store them for later use.
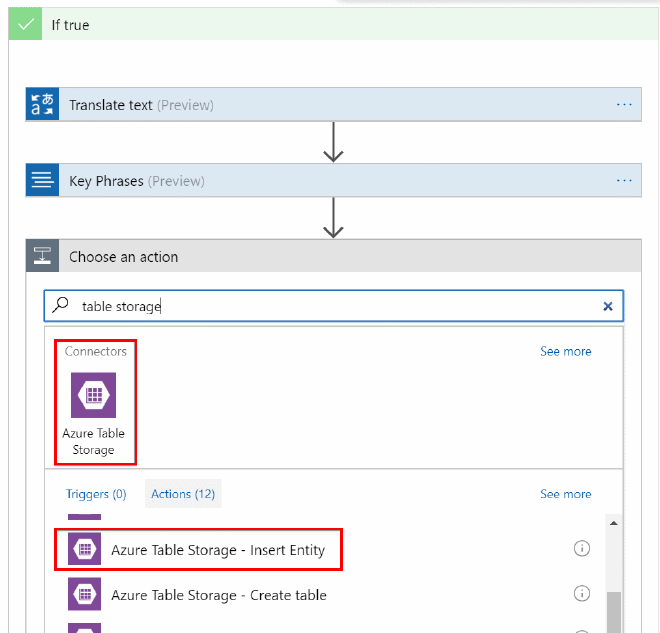
Create a new table inside the storage account. I used the hashtag of the game as the table name (BELJPN). When the table is created, go back to the Logic App designer and add a new action after both the ‘Key Phrases’ actions. Select Azure Table Storage as the connector and Insert Entity as action.
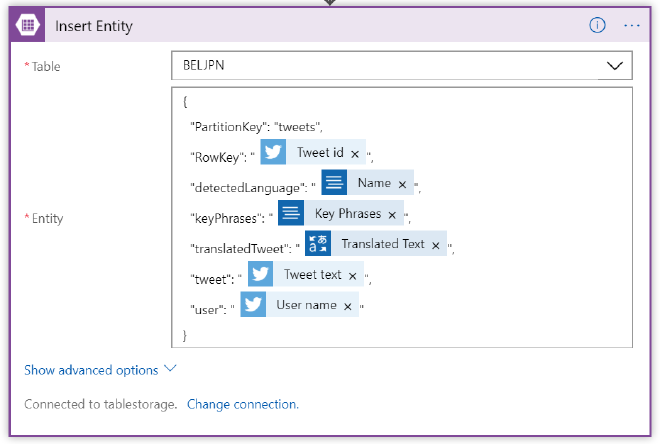
Enter a connection name, select the storage account you have created earlier and hit create. When the connection has been made select the table where you want to save the data. In the Entity field we can define the columns to store in the form of a JSON object. I defined it like this:
{
  "PartitionKey": "",
  "RowKey": "",
  "detectedLanguage": "",
  "keyPhrases": "",
  "translatedTweet": "",
  "tweet": "",
  "user": ""
}
The PartionKey and a unique RowKey (f.e. the Tweet Id) are required, all other columns are optional and names can be chosen freely.I stored the detected language, the key phrases (duh), the translated tweet (of course only when the tweet has been translated), the untranslated tweet and the user that sent the tweet. Once again use the Dynamic Content to add values to the properties.
If you haven’t done so already, repeat this action after the ‘Key Phrases’ action where we didn’t do the translation earlier, this time leave the value for the translatedTweet empty.
That’s it! The completed design should look like this:
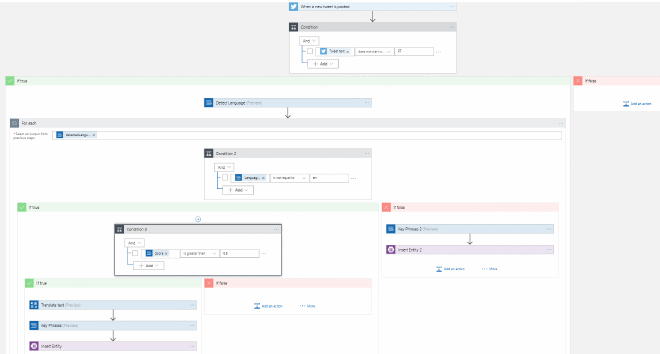
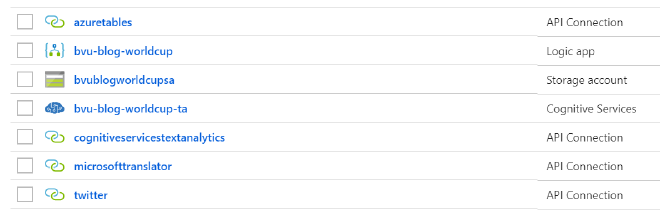
Next to the resources we have created at the start, the Logic App has also added some API connections to the Resource group. These were created when we specified the connections to Twitter, Azure Translate, Azure Text Analytics and Azure Table Storage during the design of the Logic App.
Now we are ready to run the Logic App! Make sure the Logic App is enabled and hit run when the game begins to start collection tweet data. We can use Azure Storage Explorer the see if data is being entered into the table. Don’t forget to disable the Logic App when the game has finished.
Analysis #
Now that we have some data it’s time to see if we can make something out of it. For this we will use Power BI desktop. As I mentioned in the intro, I’m totally new to Power BI, so I was learning along the way and it’s quite possible that some steps I took can be done in a much better or more efficient way. If you think that’s the case please let me know in the comments. So far the disclaimer, let’s get started.
Connect to the data #
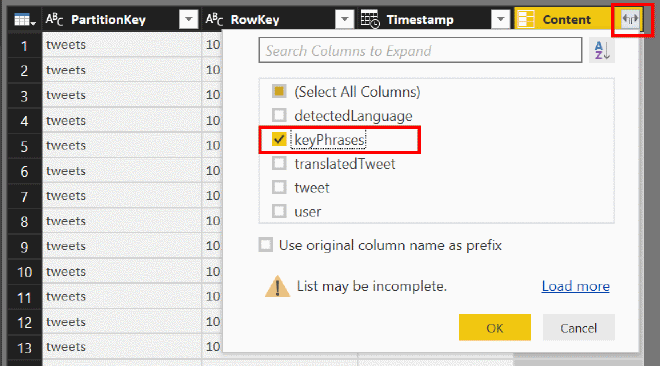
Open Power BI desktop and click on the Get Data button. Select Azure - Azure Table Storage, click connect and enter the name of the Table Storage resource created earlier. Next select the table you used to store the data and hit edit to open the Power Query Editor.Extend the content column to see the columns the Logic App has stored, for now we only need the keyPhrases column. The ‘keyPhrases’ column contains the array of key phrases returned by Azure Text Analytics.
Prepare the data #
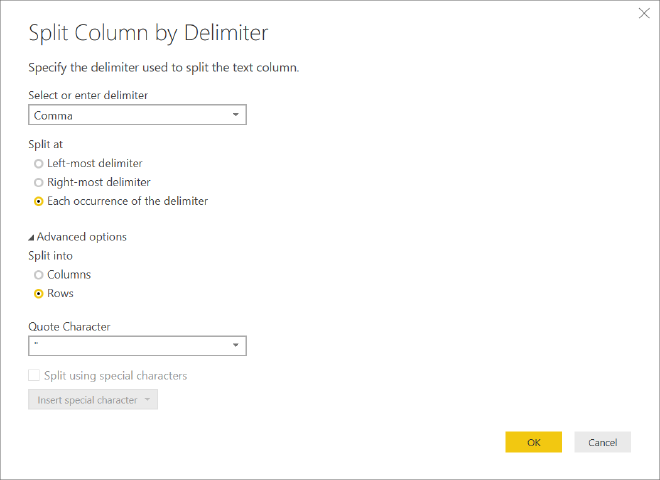
To make it a bit easier to do an analysis on this data we need to save every key phrase in the array as a separate row. Make sure you have the ‘keyPhrases’ column selected, then click Replace Values and remove the opening and closing brackets. Next click Split Column - By Delimiter, use ‘comma’� as delimiter, split at each occurrence of the delimiter, expand the advanced options and select ‘split into rows’. Click Close and Apply to save the query and close the editor.
Every key phrase should have it’s own row now.
Visualize #
First let’s try to visualize the most used key phrases during the game in a chart.
For this we can select a Stacked bar chart and drag the ‘keyPhrases’ field to Axis and Value. This will give us the count of each key phrase.
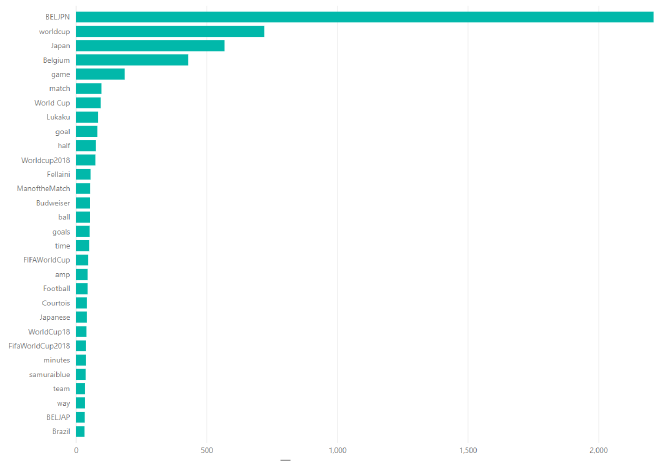
What can we learn from this? Well, to be honest, not much. The most used key phrases are the hashtag of the match, worldcup in different forms (worldcup, World Cup, WorldCup2018), the two countries (Belgium and Japan), ‘match’ and ‘game’. But we can also see some players (Lukaku, Fellaini, Courtois) and ‘goal(s)’ in the list. I guess the game didn’t end in 0-0, but that’s pretty much all we can tell from this. It would be nice if we could extract some more detailed information about the match from our data.
We may get some more information if we split the match into periods and see which key phrases occurred most often during each period. If we look at periods of, let’s say five minutes, we may see if anything interesting happened during that five minutes based on how many times a certain key phrase was used. For example, if a goal was scored during that period we can expect to find the key phrase ‘goal’ and probably also the name of the player who scored.
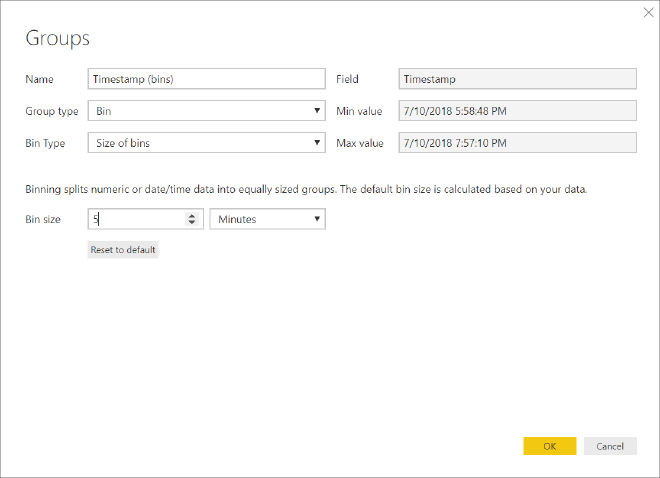
In Power BI we can define the Bin size to put values into equally sized groups. That sounds exactly what we need. Expand the existing query, right-click on the ’timestamp’ field and select New group. This will open the Groups window. Select 5 minutes as the bin size and leave everything else as default.
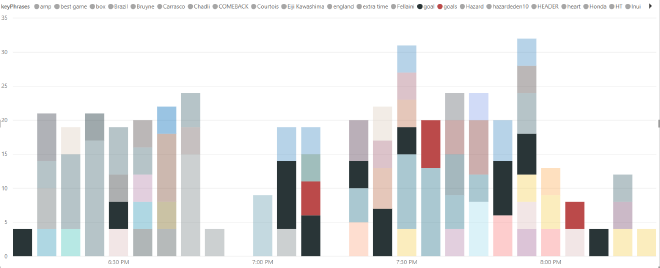
Now let’s add a Stacked column chart. Drag the new ‘Timestamp (bins)’ field to ‘Axis’ and ‘Value’ and the ‘keyphrases’ field to Legend. This will give us a bar for every 5 minutes of the game that contains all the key phrases (and the count) found in that period.
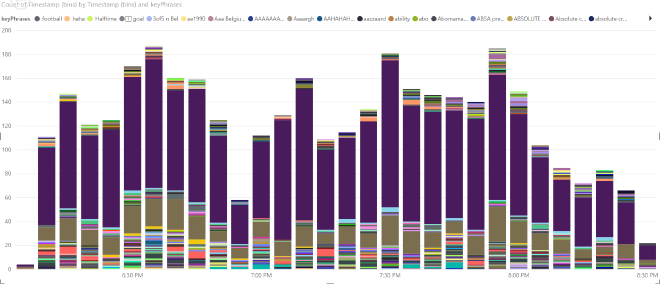
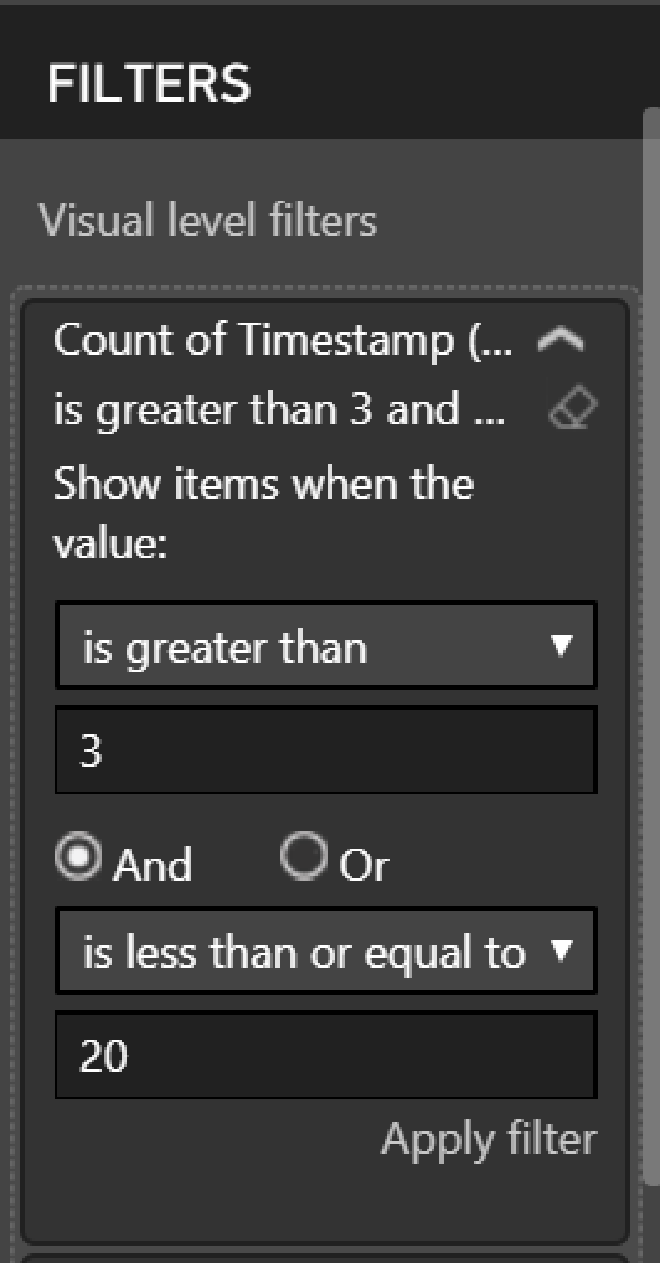
Now we want to see only the interesting events in this 5 minute period so we want to filter the key phrases with a low count (too specific) and a very high count (too common). Depending on the chosen bin size and the amount of tweets collected you might have to play around with these values to get the best results. I filtered all key phrases with a count lower than 4 and higher than 20. You can extend the filtering to also filter out specific key phrases, like the country names, game, match, worldcup, World Cup, WorldCup2018 etc. to clean the data some more.
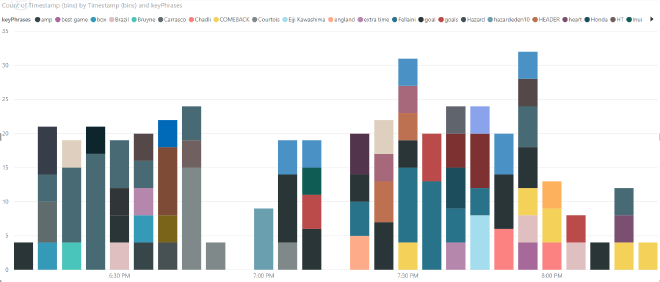
That will result in a much cleaner chart:
Analyse the game based on the Tweets #
Let’s keep it simple and see if we can determine when and by who the goals were scored by focusing on the ‘goal’ and ‘goals’ key phrases .
By focusing on the bars containing the ‘goal’ and ‘goals’ key phrases and taking a look at the other key phrases in these bars I ended up with the following:
- 6:10 first mention of a goal, but no other key phrases that indicate a goal, so I guess a false positive
- 6:30 goal is combined with key phrases for two Belgium players (Lukaku and Kompany). 1-0 for Belgium?
- 7:05 goal combined with ‘Courtois’ (the Belgian goalie) and ‘wow’, Japanese goal?
- 7:10 goal combined with ‘goals’, ‘wow’ and ‘Inui’ (JPN). If ‘goals’ was missing I would think people were still tweeting about the goal in 7:05, but my guess is two goals for Japan in a short period.
- 7:20 goal combined with ‘Fellaini’ (BEL) but also with ’england’ and ‘Martinez’ which makes it suspicious
- 7:25 goal combined with ‘Vertonghen’ (BEL) and ‘Header’. Vertonghen scored with a header?
- 7:30 goal combined with ‘Fellaini’, ‘Header’, ‘wow’, ‘comeback’ and ‘Vertonghen’. Fellaini scored with a header or was it still tweets about the previous goal?
- 7:35 goals combined with ‘Fellaini’ so I guess the it was two goals in a short period, one by Vertonghen and one by Fellaini, probably both with a header.
- 7:50 goal combined with ‘Chadli’ (BEL) and ‘wow’
7:50 Would also be the end of the game so if it didn’t end in a tie we can ignore the remaining bars on the chart. Based on this we can conclude the final score for BEL-JPN to be 5-2, but first let’s take a closer look before we draw our final conclusion.
We will start with, what we suspect, is the first goal of the Japanese at 7:05. Ease up on the filtering in Power BI to also see key phrases with a lower count. Now the key phrases ‘JPN goal’, ‘Haraguchi’, and ’lead’ appear in the bar at 7:05.
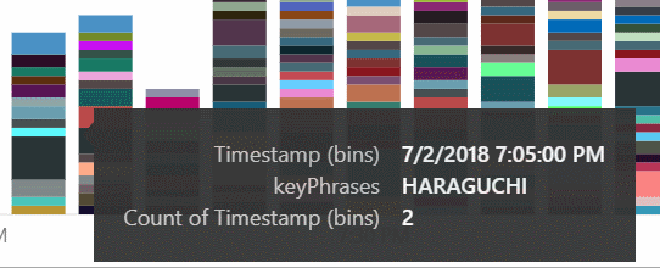


So certainly a goal from Japan that even took the lead, which would mean that the goals we had previously found (6:10, 6:30) were not really goals for the Belgians. So at this point we can conclude:
- 7:05, 50′ 0-1 Haraguchi
- 7:10, 55′ 0-2 Inui
- 7:20, 65′ 1-2 Fellaini
- 7:25, 70′ 2-2 Vertonghen
- 7:30, 75′ 3-2 Fellaini
- 7:50, 95′ 4-2 Chadli
That looks like an amazing comeback by the Belgians. No wonder we see the key phrase ‘comeback’ mentioned a lot from 7:30 and later.
The moment of truth #
Now it’s time to compare my conclusion with the results of the actual 1/8 final match Belgium – Japan:
- 0-1 48′ Harguchi
- 0-2 52′ Inui
- 1-2 69′ Vertonghen
- 2-2 74′ Fellaini
- 3-2 94′ Chadli
Not bad! Only the goal by Fellaini at 65′ wasn’t an actual goal. The rest of the conclusions based on key phrases from Tweets with hashtag #BELJPN were pretty spot on for time and goal scorer. I was even right that Vertonghen and Fellaini scored through headers.
Conclusion #
In this blog post we used Logic Apps to collect tweets and used Cognitive Services to detect the language of the tweet. If necessary we translated the tweet to English before extracting the key phrases with Cognitive Services. We stored the data in Azure Table Storage and analyzed it with Power BI. With the right presentation of the data in Power BI we were able to get a pretty good picture of when goals were scored, by who and in some cases even how.
I hope you enjoyed this post and would love to hear of your experiments with Logic Apps and Azure Cognitive Services. You can always contact me or leave a comment below!
And of course thanks to Henk Boelman for the inspiration and the #RedDevils and #BlueSamurai for an amazing match, according to some tweets the best game so far in the World Cup.