This post is the second part of a two-part blog post. In the first blog post we mainly focused on laying the groundwork for the release of the Bot. We made some adjustments to an existing Bot Project from the Bot Builder Samples repository and created a build pipeline in Azure DevOps.
In this post we will focus on deploying the Bot to Azure. We will create an ARM template to declaratively describe the resources we need to provision on Azure and we will create the actual release pipeline in Azure DevOps.
Creating the ARM template #
The build pipeline we created in the first part of this blog post produced an artifact which contains our build Bot project in the form of a zip file. We can use this artifact to deploy the Bot to Azure, but at the moment we don’t have anything to deploy to yet. Let’s do a quick inventory of the required resources.
When we create a Web App Bot from the Azure portal, Azure will create a Bot Service and an App Service Web App. The App Service will host and run our Bot and it will provide an endpoint to be used by the Bot Service to connect to the Bot. In the Bot Service we can configure (channels, authentication, analytics), test and scale our Bot. Every Web App requires an App Service Plan and we also use LUIS and Application Insights as external services in our Bot. That means that for this project we need to create the following services in Azure:
- App Service Plan
- Web App
- Bot Service
- Application Insights
- Language Understanding (LUIS)
We will use anARM (Azure Resource Manager) template to create all of these resources in Azure. An ARM template is a JSON file that describes one or more Azure resources and can be used in an Azure DevOps Release pipeline to automatically provision them. For this blog post I will assume you have some basic knowledge of ARM templates. If that’s not the case you can read more on ARM templates and look at some examples here.
We could add the template files to the existing Bot project, but I prefer to keep them in a separate project. Add a new project to the solution. Select cloud in the left menu and Azure Resource Group as the project template.
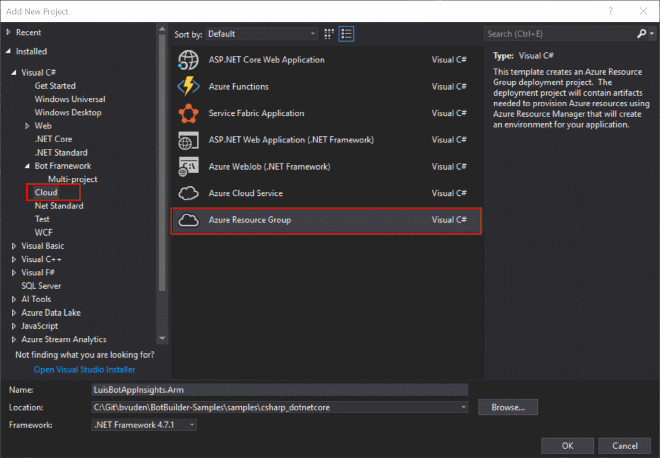
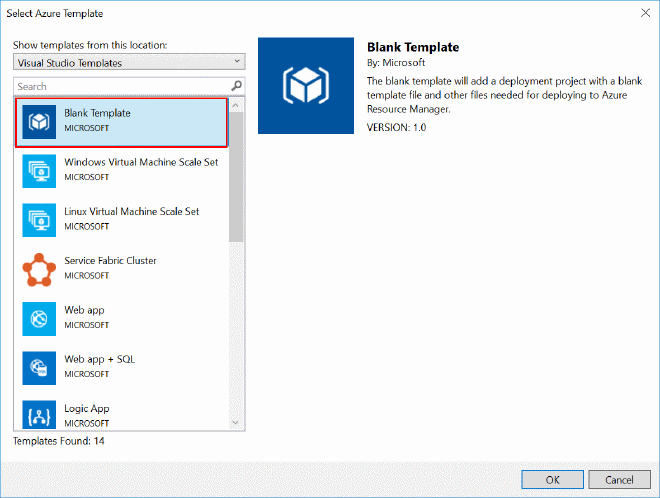
When creating the project, Visual Studio will give us some basic templates to choose from. Select the Blank template because this will give us a nice clean template to start building on.
The created project will have two JSON files, azuredeploy.json and azuredeploy.parameters.json.
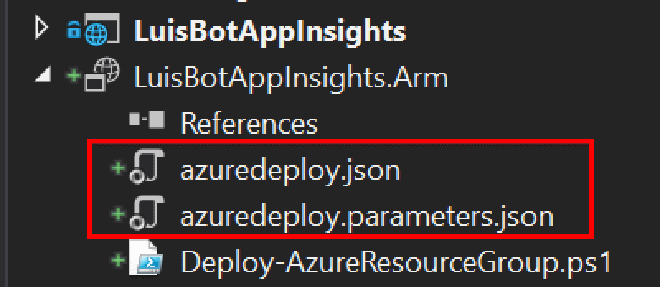
Azuredeploy.json is the ARM template file, the other file contains values for parameters that are used in the template file. Some settings of a resource (f.e. the name or scale unit) can differ for the various environments you want to deploy to. We can use different parameter files for each of those environments, but still use the same template file. For the purpose of simplicity we will not use the parameter file in this blog post but provide default values for most parameters. We will not give a default value to the parameters that contain secrets. Those values will be provided at release time with the help of (secret) pipeline variables. More on that later.
The azuredeploy.json file contains the basic JSON structure for an ARM template. with parameters, variables, resources and outputs:
{
  "$schema": "https://schema.management.azure.com/schemas/2015-01-01/deploymentTemplate.json#",
  "contentVersion": "1.0.0.0",
  "parameters": {},
  "variables": {},
  "resources": [],
  "outputs": {}
}
Now it’s time to start adding the different resources to the template. The Web App, App Service Plan and Application Insights resources are pretty common and I will not go in to much detail on how to add them. I will just show you the parameters and resources to add to the ARM template. In case you don’t want to follow along and just get the completed ARM template, you can get it in this gist.
Add App Service Plan #
Add the following parameters to the parameters section:
"hostingPlanName": {
  "type": "string",
  "defaultValue": "bvubotv4hostingplan",
  "minLength": 1
},
"skuName": {
  "type": "string",
  "defaultValue": "F1",
  "allowedValues": [
    "F1",
    "D1",
    "B1",
    "B2",
    "B3",
    "S1",
    "S2",
    "S3",
    "P1",
    "P2",
    "P3",
    "P4"
  ]
},
"skuCapacity": {
  "type": "int",
  "defaultValue": 1,
  "minValue": 1
}
And to the resources section
{
  "apiVersion": "2015-08-01",
  "name": "[parameters('hostingPlanName')]",
  "type": "Microsoft.Web/serverfarms",
  "location": "[resourceGroup().location]",
  "tags": {
    "displayName": "HostingPlan"
  },
  "sku": {
    "name": "[parameters('skuName')]",
    "capacity": "[parameters('skuCapacity')]"
  },
  "properties": {
    "name": "[parameters('hostingPlanName')]"
  }
}
Notice how we use the parameters when defining the resource.
Add Web App #
Add to parameters:
"webAppName": {
  "type": "string",
  "defaultValue": "bvubotv4"
},
"botFilePath": {
  "type": "string"
},
"botFileSecret": {
  "type": "string""
}
Add to resources:
{
  "apiVersion": "2015-08-01",
  "name": "[parameters('webAppName')]",
  "type": "Microsoft.Web/sites",
  "location": "[resourceGroup().location]",
  "dependsOn": [
    "[resourceId('Microsoft.Web/serverfarms/', parameters('hostingPlanName'))]"
  ],
  "properties": {
    "name": "[parameters('webAppName')]",
    "serverFarmId": "[resourceId('Microsoft.Web/serverfarms', parameters('hostingPlanName'))]",
    "siteConfig": {
      "appSettings": [
        {
          "name": "botFilePath",
          "value": "[parameters('botFilePath')]"
        },
        {
          "name": "botFileSecret",
          "value": "[parameters('botFileSecret')]"
        },
        {
          "name": "WEBSITE_NODE_DEFAULT_VERSION",
          "value": "8.9.4"
        }
      ]
    }
  }
}
Remember that appsettings.json (or secrets.json) had a botFileSecret and botFilePath property? It’s best practice to add properties from the local appsettings.json file to the appSettings section in the ARM resource. These environment variables will override the local variables (appsettings.json). This way we don’t have to redeploy the Bot when a setting has to change but we can simply go the Azure portal and update the values there.
We also define a default NodeJS version, this will ensure NodeJS is available in the App Service. We will need it to install the MSBot CLI and execute commands.
Add Application Insights #
Add to parameters:
"appInsightsName": {
  "type": "string",
  "defaultValue": "bvubotv4appinsights"
}
Add to resources:
{
  "apiVersion": "2014-04-01",
  "name": "[parameters('appInsightsName')]",
  "type": "Microsoft.Insights/components",
  "kind": "web",
  "location": "[resourceGroup().location]",
  "dependsOn": [
    "[resourceId('Microsoft.Web/sites/', parameters('webAppName'))]"
  ],
  "properties": {
    "applicationId": "[parameters('webAppName')]"
  }
}
Add Bot Service #
All the resources described so far are pretty common with plenty of documentation and examples online. The Bot Service is different though. I couldn’t find any examples online and even the GitHub repository containing all the ARM schemas didn’t contain a schema for the Bot Service. So I tried a couple of things to reverse engineer the ARM template via the Azure Portal.
First I tried the Automation Script option that is available for a Resource Group in the Azure Portal. Although this usually creates a bloated ARM template it was worth a shot. I created a new Resource Group containing a Web App Bot and clicked on Automation Script. Unfortunately I received the message that some resources could not be exported yet and were not included in the template:
"The schema of resource type 'Microsoft.BotService/botServices' is not available. Resources of this type will not be exported to the template. (Code: ResourceTypeSchemaNotFound, Target: Microsoft.BotService/botServices)".
The second option was to create a Web App Bot via the Azure Portal, but instead of creating the resource click on the Automation options to create an ARM template.
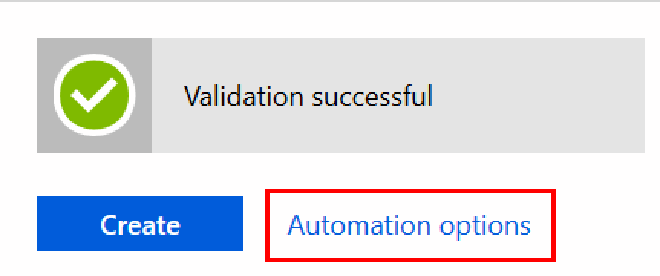
Luckily this approach was more successful. It created a convoluted template with a lot of unnecessary code, but at least it was something that I could work with. After some trial and error I got the lean result I wanted with the following:
Add to parameters:
"msaAppId": {
  "type": "string"
},
"botServiceSkuName": {
  "type": "string",
  "defaultValue": "F0",
  "allowedValues": [
    "F0",
    "S1"
  ]
}
The msaAppId parameter will contain the value of the Microsoft App Id. We will see how to get this value when we create the Release pipeline.
Add to variables:
"siteHost": "[concat(parameters('webAppName'), '.azurewebsites.net')]",
"botEndpoint": "[concat('https://', variables('siteHost'), '/api/messages')]"
Add to resources:
{
  "apiVersion": "2017-12-01",
  "type": "Microsoft.BotService/botServices",
  "name": "[parameters('webAppName')]",
  "location": "global",
  "kind": "sdk",
  "sku": {
    "name": "parameters('botServiceSkuName')]"
  },
  "properties": {
    "name": "[parameters('webAppName')]",
    "displayName": "[parameters('webAppName')]",
    "endpoint": "[variables('botEndpoint')]",
    "msaAppId": "[parameters('msaAppId')]",
    "developerAppInsightsApplicationId": "[parameters('appInsightsName')]",
    "developerAppInsightKey": "[reference(resourceId('microsoft.insights/components/', parameters('appInsightsName')), '2015-05-01').InstrumentationKey]"
  },
  "dependsOn": [
    "[resourceId('microsoft.insights/components/', parameters('appInsightsName'))]"
  ]
}
Location should be global instead of the location of the Resource Group we used for the other resources and kind should be sdk.
Add Language Understanding (LUIS) #
Add to parameters:
"luisName": {
  "type": "string",
  "defaultValue": "bvubotv4luis"
},
"luisSkuName": {
  "type": "string",
  "defaultValue": "F0",
  "allowedValues": [
    "F0",
    "S0"
  ]
}
Add to resources:
{
  "apiVersion": "2017-04-18",
  "type": "Microsoft.CognitiveServices/accounts",
  "name": "[parameters('luisName')]",
  "location": "[resourceGroup().location]",
  "kind": "LUIS",
  "sku": {
    "name": "[parameters('luisSkuName')]"
  },
  "properties": {}
}
That’s it! We’ve added all required parameters and resources to the ARM template. Now we could use it in an Azure DevOps Release pipeline to automatically provision the required resources for our Bot in Azure. Before we start with that, there is one more thing to add to the ARM template, namely the Outputs. In the Outputs section, we can specify values that are returned from the deployment.
After we have provisioned the resources and have deployed our Bot we will need to update the Bot Services (via the Bot’s configuration file) to use the services we just created like LUIS and Application Insights. To be able to update the Bot Services we need to know the value of some of their properties, like id’s, keys and endpoints. These values are created during the provisioning process and we can add them to the ARM Outputs section to make them available for tasks in our Release Pipeline.
Add the following values to the Output section:
"webAppName": {
  "type": "string",
  "value": "[parameters('webAppName')]"
},
"luisKey1": {
  "type": "string",
  "value": "[listKeys(variables('luisId'),'2016-02-01-preview').key1]"
},
"botEndpoint": {
  "type": "string",
  "value": "[variables('botEndpoint')]"
},
"appInsightsInstrumentationKey": {
  "type": "string",
  "value": "[reference(resourceId('Microsoft.Insights/components', parameters('appInsightsName')), '2014-04-01').InstrumentationKey]"
}
Also add the luisId variable to the variables section:
"luisId": "[concat(resourceGroup().id,'/providers/','Microsoft.CognitiveServices/accounts/', parameters('luisName'))]"
Updating Continuous Integration Build #
Now that we have our ARM template we need to add it to the artifacts of our Continuous Integration Build to make it available in the Release Pipeline we are about to create.
Edit the CI Build and add a Copy Files task before the Publish Artifact task. The Source Folder field should point to the folder containing the ARM template. Add **.json to the Contents field to only copy JSON files to the Target Folder, which should be the Artifacts Staging Directory of the build.
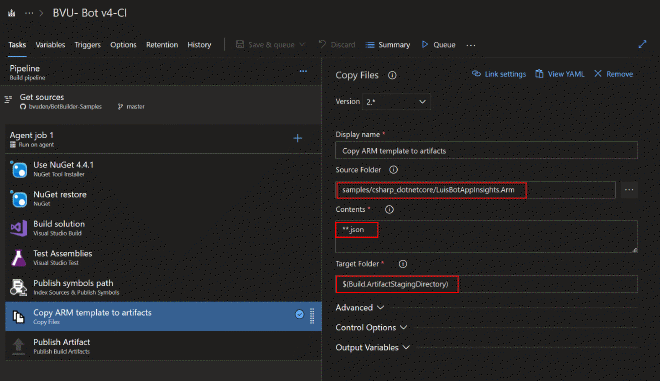
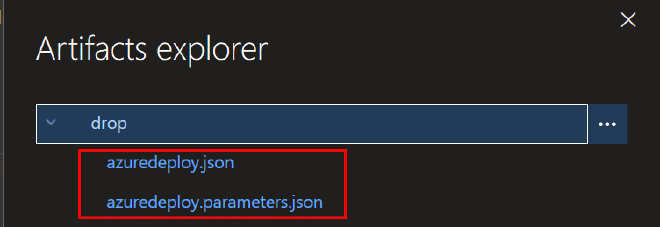
Hit Save & Queue to trigger a new build. Check the artifacts for the ARM template and Parameters file after the build completes.
Microsoft Application Registration #
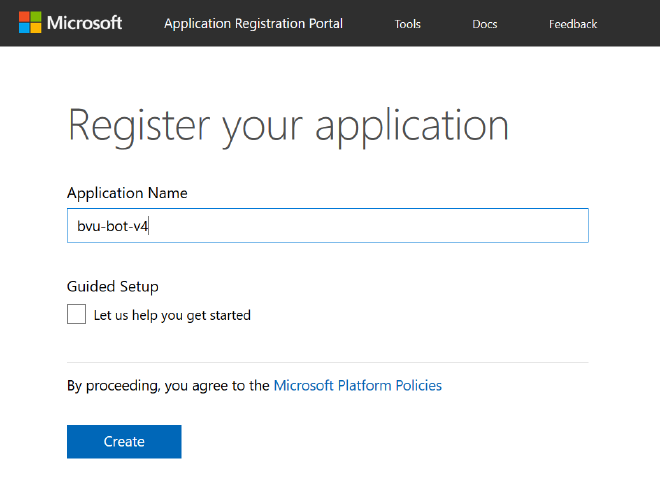
We need a Microsoft Application Id and Password to be able to use the Bot with the Bot Service. When creating a Web App Bot from the Azure Portal the Microsoft Application Id and Password will be created automatically, but in our case we need to do this manually on the Microsoft Application Registration Portal. Login and click on Add an App. Enter a name for the app and hit Create.
This will take you to the Registration page where we can find the Application Id. On the same page under Application Secrets click on Generate New Password to create a password for the application.
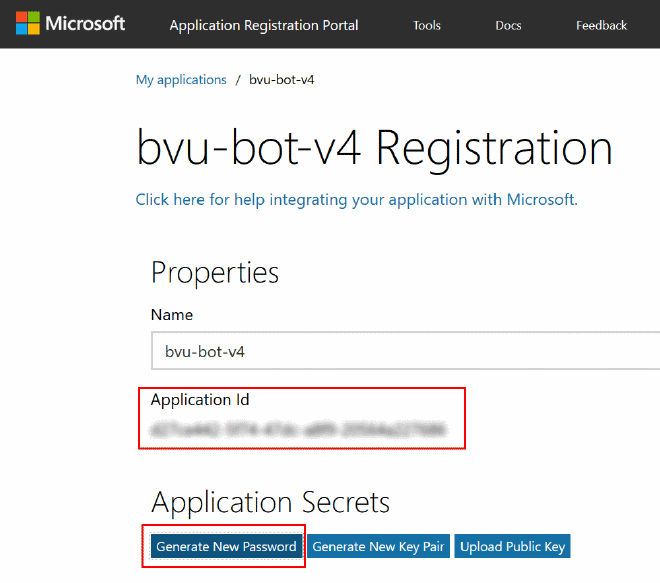
Take a note of the Application Id and Password, we will use both in the Release Pipeline.
Adding Continuous Deployment #
Create a Release Pipeline #
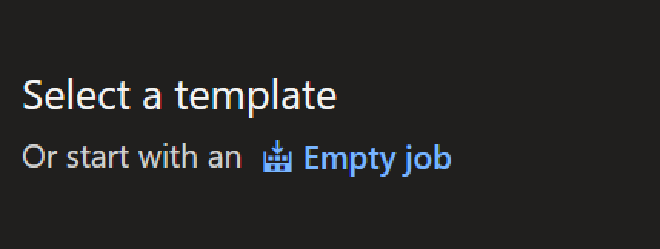
Create a new Release Pipeline in Azure DevOps Pipelines and choose to start an Empty job.
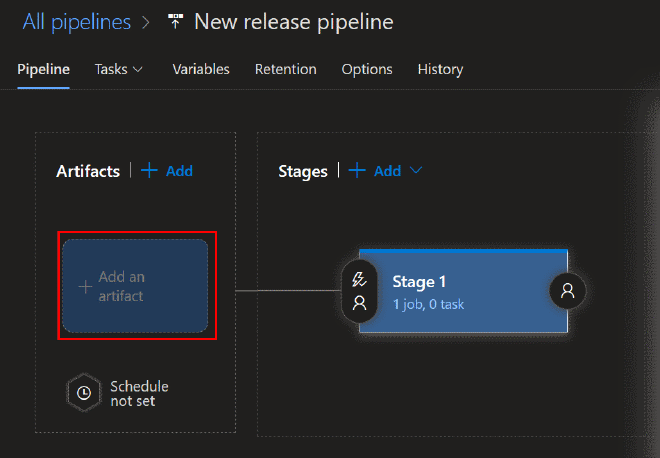
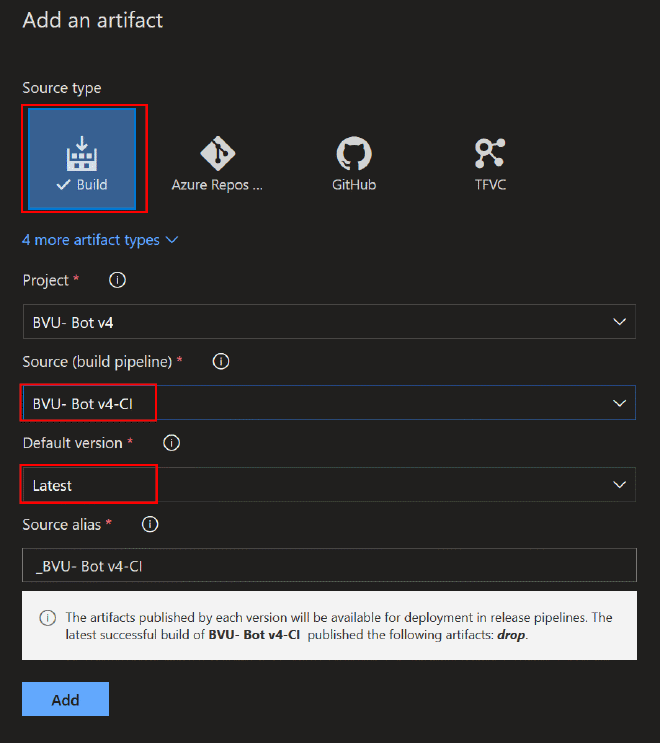
First we want to add an artifact to the release. This will be the most recent result of the CI Build we created earlier. Adding this artifact will make the zip containing the Bot files and the ARM template available in the release.
Select the latest build from the CI build created earlier.
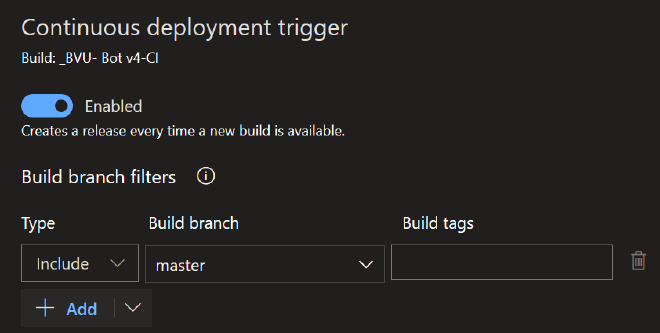
Click on the continuous deployment trigger (the lightning symbol in the upper-right corner of the artifact), enable the trigger and select a build branch. This will trigger a release every time a build on that branch completes.
Now rename the release pipeline and save it before we start adding tasks to the pipeline.
Add tasks to the release pipeline #
Click on the� view stage tasks link in the already added stage (by default named ‘Stage 1’) to start adding tasks.
Task 1: Azure Resource Group Deployment #
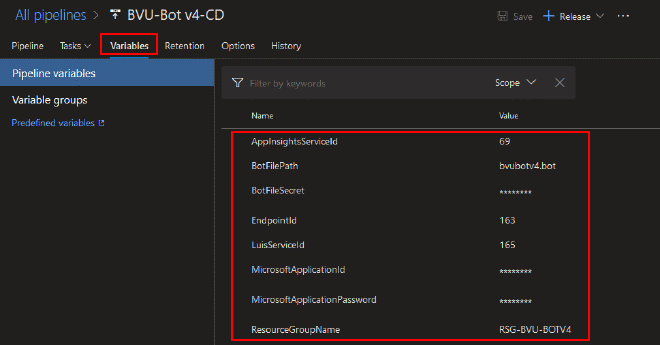
Before we add the task we will store the name of the Resource Group we are about to create as a pipeline variable. We will need to enter the name of the Resource Group in multiple steps and defining it in one place reduces the risk of typos. Click on the variables menu item and add a new name value pair (f.e. ResourceGroupName – RSG-MYBOT).
Since we are on the variables page let’s also add variables for the parameters in the ARM template without default values:
- BotFileSecret (value from appsettings.json (or secrets.json))
- BotFilePath (value from appsettins.json (or secrets.json))
- MicrosoftApplicationId (the Application Id of the created app in the Microsoft Application Registration Portal)
Also add the following variables:
- MicrosoftApplicationPassword (the Application Password of the created app in the Microsoft Application Registration Portal)
- EndpointId (the Id of the production endpoint defined in the .bot file)
- LuisServiceId (the Id of the LUIS service defined in the .bot file)
- AppInsightsServiceId (the Id of the Application Insights service defined in the .bot file)
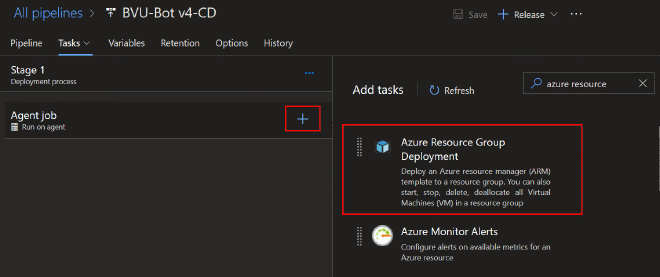
Add the Azure Resource Group Deployment task to the stage.
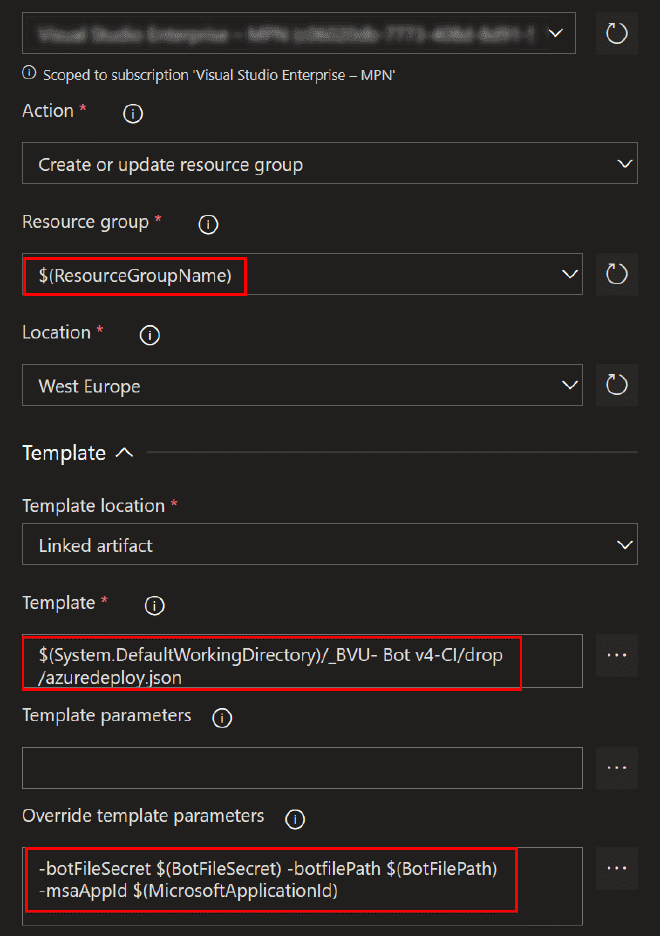
Select the task and edit the settings. In the Resource group field we use the value of the ResourceGroupName variable. In the template field select the ARM template from the build artifact. In the Override template parameters field we use the defined variables to set values for the parameters with missing (default) values.
Oke, that should be enough to do our first release. Save the pipeline and create a new release. After the release has finished successfully we can check if all the resources we defined in the ARM template are actually created. Go to the Azure portal and validate the Resource group has been created with all the resources in it.

Also make sure the App Settings (BotFileSecret, BotFilePath and WEBSITE_NODE_DEFAULT_VERSION) of the App Service have the expected values. We defined the settings in the ARM template and used the pipeline variables to provide a value.
Remember the properties for the Bot Service we defined in the ARM template?
"properties": {
  "name": "[parameters('webAppName')]",
  "displayName": "[parameters('webAppName')]",
  "endpoint": "[variables('botEndpoint')]",
  "msaAppId": "[parameters('msaAppId')]",
  "developerAppInsightsApplicationId": "[parameters('appInsightsName')]",
  "developerAppInsightKey": "[reference(resourceId('microsoft.insights/components/', parameters('appInsightsName')), '2015-05-01').InstrumentationKey]",
}
We can now find them in the Bot Service (Web App Bot) settings blade. Under Configuration we see that the endpoint has the value of the ‘botEndpoint’ variable we defined in the ARM template. The Microsoft App Id must be the value of the ‘msaAppId’ parameter that has no value in the template, but was overridden with the MicrosoftApplicationId variable that we defined in the pipeline. Under Analytics we should see the properties of the created Application Insights resource (Instrumentation Key, API key and Application Id), because of the ‘developerAppInsightsApplicationId’ and developerAppInsightsApplicationKey’ properties.
When we open the deployments blade of the created resource group and select the deployment, we should see the values of the outputs we defined in the ARM template. We need these values when we deploy our Bot to the App Service, so in the next step in the release pipeline we will make them available to the pipeline tasks.
Task 2: ARM Outputs #
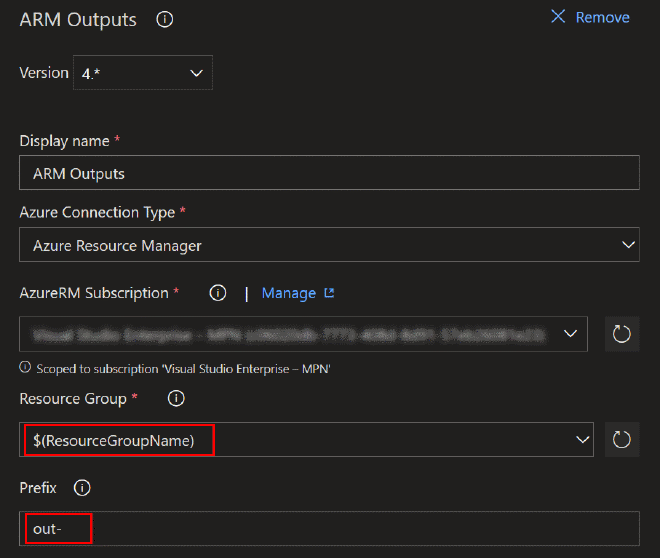
We could write some Powershell ourselves to make the output values of the implementation available in the pipeline, but fortunately there are some extensions available in the marketplace that can do that for us. I used the ARM Outputs extension created by Kees Schollaart. This extension reads the output values of an ARM deployment and makes them available as variables in our pipeline.
Click on the plus sign to add another task to the release pipeline, search for ARM Outputs and install the extension.
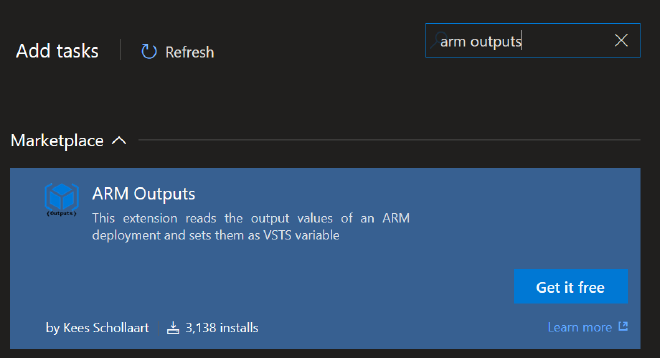
Once installed, add the task to the pipeline.
Now select the Azure subscription and once again use the ResourceGroupName variable as value for the Resource Group field. It’s not required, but you can also provide a prefix value. This will add the prefix to the output name and makes it easier to distinguish between the output variables and the pipeline variables.
Task 3: Azure App Service Deploy #
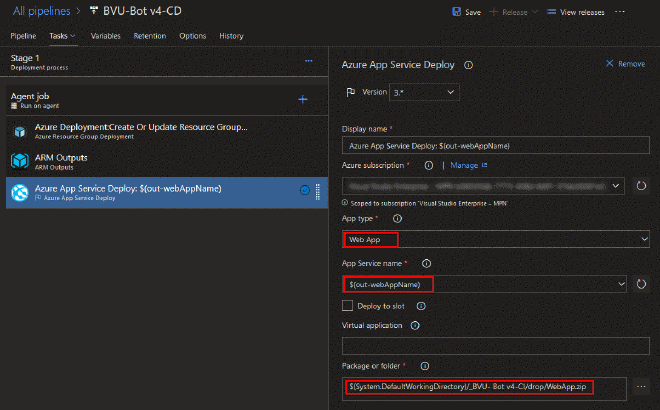
Now it’s time to deploy the Bot to the created Azure resources. Add an Azure App Service Deploy task to the release pipeline. Select your Azure subscription and Web App for the App type field. For App Service Name we will need to use the name of the App Service we created with our ARM template. We added the name to the ARM output values and is made available as a variable in the previous task. Enter $(out-webAppName) as the value. Select the zip file from the linked artifacts for the Package or folder field or leave the default value of $(System.DefaultWorkingDirectory)/**/*.zip, because we only have one zip file in our artifacts.
That in itself is enough to deploy the Bot to Azure. But the Bot will not be configured correctly. We still need to change some Bot settings (in the .bot file) like the endpoint and configure it to use the external services (LUIS, Application Insights) we created with the help of the ARM template. We used the MSBot CLI in the first part of this blog post to do this for the Bot running on our local development environment. We are going to do the same in this release pipeline.
In the Azure App Service Deploy task we can define a script that will run on the App Service after the task has completed the deployment successfully. We can use this script to run the MSBot commands. Open the Post Deployment Action section and select Inline script for the script type. The MSbot CLI will not be installed on a new instance of an App Service so we need to do that first by adding the following line to the Inline script field:
call npm install -g msbot
Now the MSBot CLI should be installed on the App Service and we can start adding MSBot commands. Add these lines to update the Bot’s external services:
call msbot update luis --id $(LuisServiceId) --authoringKey $(out-luisKey1) --secret $(BotFileSecret)
call msbot update appinsights --id $(AppInsightsServiceId) --resourceGroup $(ResourceGroupName) --instrumentationKey $(out-appInsightsInstrumentationKey) --secret $(BotFileSecret)
This will update the LUIS and Application Insights service in the .bot file with the keys from the Azure resources we have created with the ARM template. Key1 from LUIS Cognitive Service and the AuthoringKey from Application Insights. As you can see all parameter values are provided by the output or pipeline variables.
And of course don’t forget to update the production endpoint for the Bot:
call msbot update endpoint --secret $(BotFileSecret) --id $(EndpointId) --endpoint $(out-botEndpoint) --appId $(MicrosoftApplicationId) --appPassword $(MicrosoftApplicationPassword)
This will update the Bot’s production endpoint service in the .bot file. It will set the endpoint (based on the url of the created App Service) and the Microsoft Application Id and Password.
The release pipeline should be ready now. But when I ran a new release I got an error in the Azure App Service Deploy task stating that 'msbot' is not recognized as an internal or external command.
Although the logs state that MSBot is correctly installed, the MSBot command is somehow not recognized.
D:\home\site\wwwroot>call npm install -g msbot
D:\local\AppData\npm\msbot -> D:\local\AppData\npm\node_modules\msbot\bin\msbot.js
+ msbot@4.0.7
added 100 packages in 12.603s

Standard error from script:
##[error]'msbot' is not recognized as an internal or external command,
I’m not sure what causes this error but I got around it be changing the NodeJS version in the App Settings field in the Application and Configuration Settings section of the Azure App Service Deploy task:
-WEBSITE_NODE_DEFAULT_VERSION 8.11.1
The issue doesn’t seem to be related to the used NodeJS version. Defining WEBSITE_NODE_DEFAULT_VERSION to 8.11.1 instead of 8.9.4 in the ARM template results in the same error. Switching to a different version (f.e. 8.9.4) in the Azure App Service Deploy task fixes it again.
Save the release pipeline and create and deploy a new release to test the pipeline. If all went well the Bot is deployed and configured correctly.
Updating LUIS project #
The LUIS project still uses the free endpoint. We want to replace that with the endpoint of the created LUIS resource in Azure. Unfortunately this can not be achieved in an automated way:
In order to assign the endpoint key to a LUIS app, you must use the LUIS website for the correct authoring and publishing regions. There is no automated method of doing this, regardless of mechanism such as with an Azure resource manager script, Azure CLI, programmatic SDK, or with the APIs.
Microsoft Docs
That means we can not add this action to the release pipeline and have to add the endpoint manually on the LUIS website. Navigate to Keys and Endpoints on the Manage page and click on the Assign resource button.

Select the tenant, subscription and the LUIS resource created by the release pipeline.
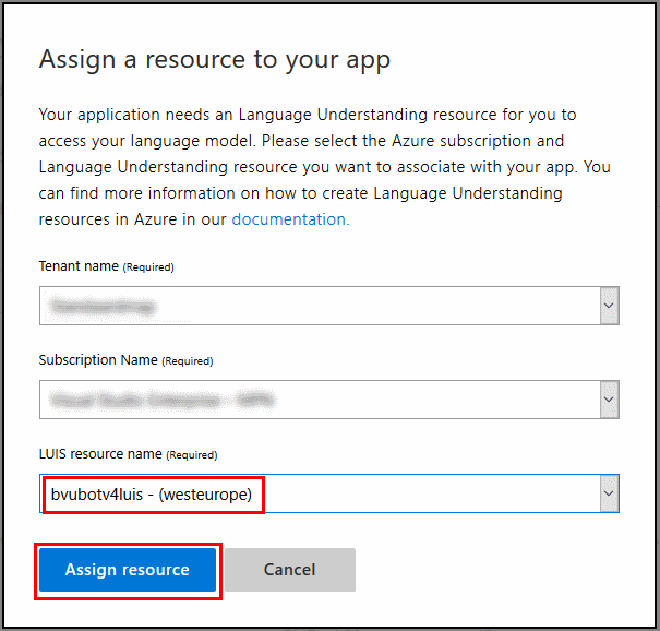
After you click Assign Resourcethe resource will be visible in the resource overview table.

We used the value of Key1 as the AuthoringKey when we ran the update LUIS MSBot command. Now everything should be hooked up correctly.
Let’s see if it worked!
Testing the Bot #
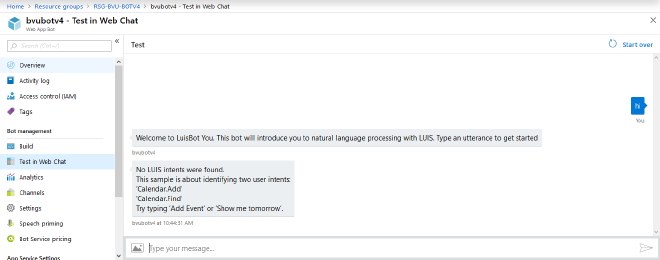
Go to the Azure portal, select the Web App Bot and open the Test in Web Chat blade. Enter some text and see if the Bot responds in the same manner as on your local development environment. If you followed the first part of this blog post and used the Bot Builder Sample project you should see the following response:
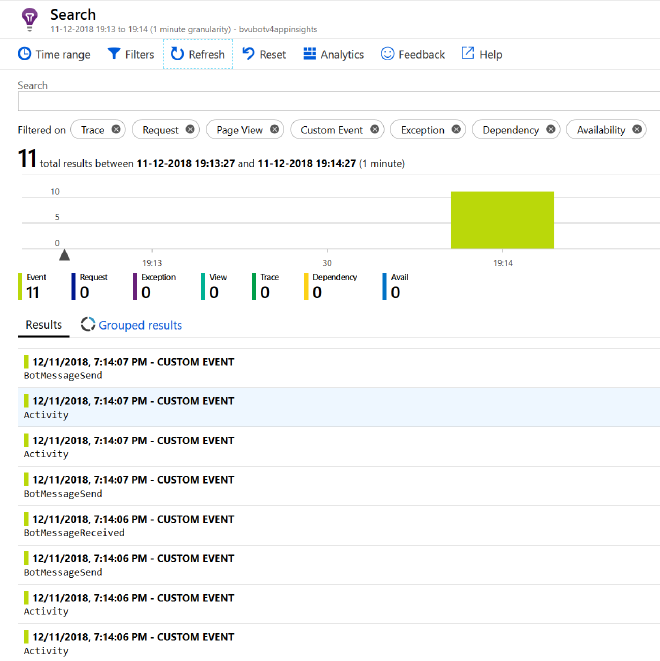
When we open Application Insights we should also see this chat activity being logged as Custom Events.
Summary #
In this second part of the blog post covering Continuous Deployment for Bots we created an ARM template that we used in an Azure DevOps release pipeline to automatically provision the required resources in Azure. Then we used the same pipeline to deploy the Bot and configure it to use the created resources like LUIS and Application Insights.
In this two part blog post we managed to automate to process of building and deploying a Bot to Azure. Now, all we need to do is push our code changes and Azure DevOps pipelines will take care of the rest. I hope you found it useful!
